Chasing bream around oyster racks has long been a favourite pursuit for many anglers, mainly due to the challenges it presents and the adrenaline rush it can invoke. Marauding bruisers, braided lines and sharp oyster shells will do that to you! Owen McPaul provides some tips to ensure you drag more fish out of the structure from your kayak.
The last fragments of mist pirouette off the warming waters beneath as the morning sun makes its first appearance for the day. It reveals a harsh and unforgiving playground. With a deep breath and final push of the paddle you try to veer yourself into prime position before shooting your lightweight offering with a bullet like cast. It whistles down the line of an oyster encrusted rail and firmly pats down inches, if not millimetres away from devastation. A few moments pass and with only a couple of twitches of your rod tip the line straightens and the rod buckles under the pressure of a fully locked up drag.
Brute power pushes your rod to its limits and the thrill of white knuckle action takes over. Adrenaline pumps through your veins while the thoughts of the last fish that busted you up run through your mind. You try desperately to control the fish via constant rod movements and angles and in those few moments you could potentially extract a trophy-sized bream or curse the razor sharp oyster shell that you just lost it to.
Personally, I don’t find many other bream chasing scenarios to be more appealing than when luring them around oyster leases. I’m a firm believer that it’s one of the few places a bream is on an even playing field with the angler and every fish – regardless of size – provides an exciting challenge.
Being based on the mid-north coast of NSW means I am blessed with an abundance of locations from which to target yellowfin bream around oyster leases. And when it comes to oyster leases, for anyone based in the surrounding areas, there’s probably no better place that comes to mind than the great lakes of Forster/Tuncurry. Its fast surging tides, white sands, crystal clear waters and kilometres of oyster leases make it one of the best trophy-sized yellowfin bream fisheries on the NSW coast.
 GEAR SELECTION
When tackling oyster leases it’s important to make sure your gear is in check. Quality lures don’t come cheap and any advantage you can take to ensure they end up back in your tackle box at the end of the day should be taken into account. A good stiff rod between 8 and 14 lb can make the task at hand a bit easier and I generally recommend 2500 reels spooled with 8 to 10 lb braided main lines. I prefer a reel that boasts a high speed gear ratio as it allows me to get more line back on the reel as quickly as possible – especially important when braid and sharp objects are within close proximity. I finish my rig with a 10 to 14 lb fluorocarbon leader, depending on the abundance of structure and general size of fish I expect to come in contact with. A quality pair of polarised sunglasses also makes for a vital tool as they provide the advantage of being able to see beneath the water’s surface with more clarity. This means you can see the fish even before they your presentation.
ADVANTAGE POINTS
Before getting a cast in there are a few key factors to take into account to ensure you achieve maximum success around the leases:
Tide: While both sides of an oyster rack can be productive, I generally focus my attention on the side where the tide is flowing towards. It not only allows you to keep the lure close to structure at all times, it also presents you with the ability to drift the lure underneath the oyster trays. For anyone familiar with this style of fishing, this is where many a bream sit in waiting for an easy meal to wash under.
Shade: Depending on the position of the sun, one side of the oyster rack is usually shaded and I find that chances of hook up are somewhat increased in the shaded sections. In my experience, I have found that fish are a lot more confident to feed when they cannot be spotted easily. If you’re lucky enough to be targeting the racks when the shade is covering the same side as the tide is moving towards, your chances of tangling with quality fish has more than doubled.
Appearance: I try to look for the oldest oyster racks available – particularly the sets that have been abandoned or neglected for some time. In these situations, the oysters can take on the appearance of an oyster reef and usually make for prime habitat for some stonker-sized fish to lurk around.
Another thing to be aware of is if the tide is flowing straight down the line of the oyster leases as working against the tide with the kayak and working the lure towards you with the flow of the water is much more productive. When fishing with the tide, your lure will be pulled towards the surface and out of the sight of the majority of the fish. So while you will spend more time on the paddle – the results will speak for themselves when opting to fish against the flow.
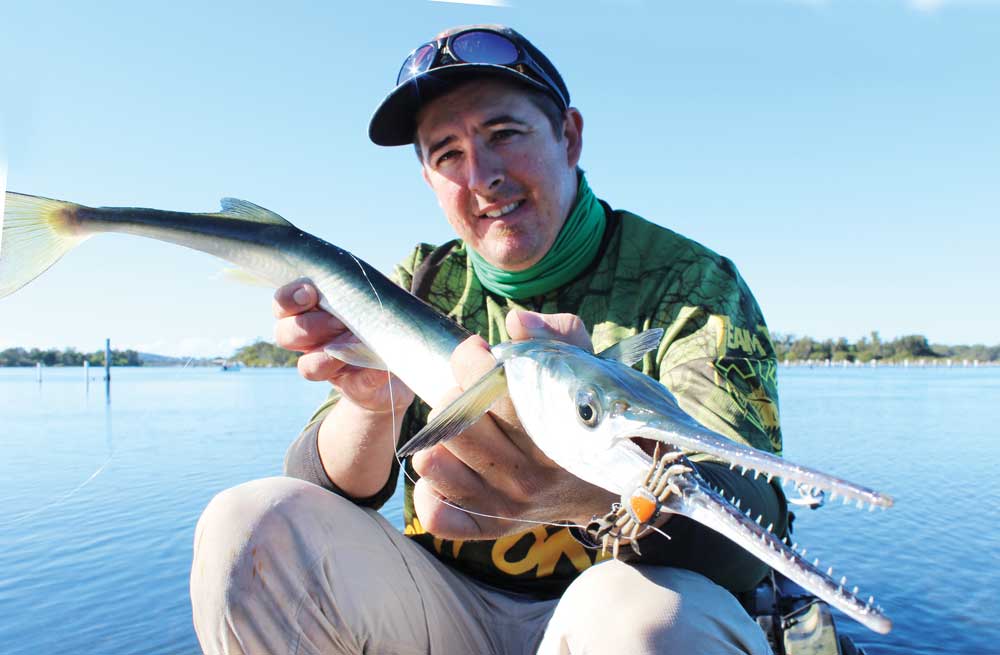
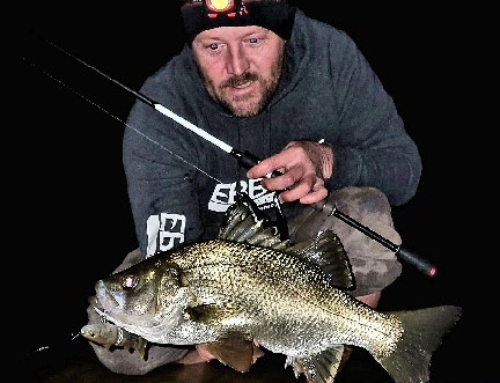
A crab presentation will undo many species of fish: this long tom was no exception!
PLASTICS
Lightly presented soft plastics are the usual go-to lure choice for most anglers and something I find myself using 90% of the time while targeting fish inside the racks. Lightly weighted plastics can be kept in the zone for a long period of time while also able to suspend in the face of predatory fish. With some practice, you will also become adept at controlling plastics over particular depths – meaning you can keep them off the bottom and away from by-catch such as flathead and whiting which also take advantage of the various ambush points around the oyster racks
When targeting the racks I generally run with grub style plastics in natural colours. The Z-Man 2.5 inch GrubZ tick all the boxes for me when it comes to this plastic style and the bloodworm and gudgeon colours are particularly effective at mimicking natural food sources. They are naturally buoyant too which helps a lot when trying to get a plastic to suspend between movements. I generally rig them on 1/20th to 1/16th oz jigheads and find the set up to be particularly deadly. In saying that though; shrimp, crab and other critter bait presentations have proven just as effective and can often be rigged on lighter jigheads due to an increased sink rate (larger surface areas).
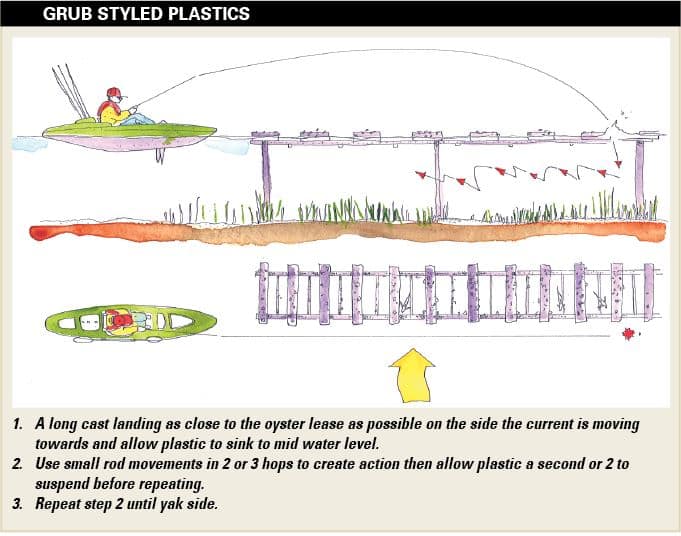
When fishing the racks one must employ precision casts – the closer you can land your cast to a lease, the better chance you have of making contact with a feeding fish. A cast that lands 10 to 15 cm shy will often not be responded to as it is too far away from the comfort zone of the racks. In this regard, it is very similar to barra fishing where structure bound casts are key to success.
I try to cast as far away from myself as possible and as close to the structure at hand. I generally allow the plastic to settle for a few seconds with the intention of it sitting roughly mid-water between the top of the rack and the bottom. Once there, I invoke a few short rod movements to imitate a fleeing baitfish or prawn before pausing or suspending for a couple of seconds. I repeat this technique throughout the retrieve and find it to be super convincing.
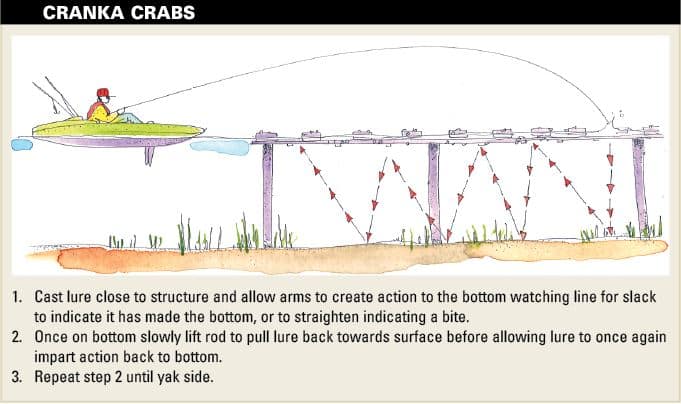
Another retrieve is to cast in close and allow the plastic to work its way towards the bottom half of the water column. With quick erratic rod movements, I like to flutter the plastic up towards the surface before allowing it to rest back towards the bottom. In most cases the lure is hit during the pause or suspending period.
 HARDBODIES
Hardbodies are a very versatile tool and prove effective over weed, down descending banks or when worked around structure. They are equally as productive when retrieved alongside oyster racks and worth their weight in gold when there is a bit of breeze kicking about. I find that casting lightly weighted soft plastics on windy days can be difficult as the wind often creates a belly of line that pulls the plastic away from the desired location.
When it comes to using hardbodies around leases I find that a mid-diving crankbait is by far the most effective. They get down to an ideal depth just below the trays and tend to draw a lot of attention due to their erratic behaviour. I also find that I tend to pick up less weed or foul up on structure that has found its way to the bottom.
As with soft plastic, the hardbody approach is very basic, yet effective. A simple straight, long cast alongside the leases is all that’s required and with the rod tip tilted towards the water, a simple slow to medium retrieve all the way back to the yak with the occasional pause every 5 or 6 revolutions of the reel’s handle is all that’s needed to draw a fish into a strike.
While fishing for bream presents its fair set of challenges, it certainly provides an adrenaline rush and some fantastic fishing at times. Whenever you next decide to take up the challenge, ensure your gear is up to the task, keep the above techniques in mind and be prepared to hook up to some trophy-sized specimens… sounds terrible doesn’t it?
Owen lives in Taree on the mid-coast of NSW. He is very passionate about his sport fishing and in particular, luring for the likes of Aussie bass, bream and tropical favourites such as jungle perch and sooty grunter. Owen is a member of the Tackle Tactics Pro Staff team and is as comfortable in a kayak or boat as he is fishing from the shore.